The following command will convert all .flv files in a directory into .mp3 files (keeping the filename). Make sure you have ffmpeg installed.
for i in *.flv; do ffmpeg -i "$i" -ab 128k "`basename "$i" .flv`".mp3; done
You can replace 128k with another bitrate. Keep in mind, however, that the conversion won't improve the quality beyond that of the bitrate of the original audio track of the .flv video file, which can be found with the command:
Then download the Multi-burst to animation script file: multi-burst-to-anim.scm and save it into C:\Program Files\GIMP-2.0\share\gimp\2.0\scripts for windows or into /usr/share/gimp/2.0/scripts under linux (you will know it is the right folder if you see several other .scm files). The GIMP is actually a very powerful image editing program, the script presented is just a little tool to extend its functionality, you can learn how to do many other interesting things with the GIMP.
Restart GIMP or refresh scripts with Filters -> Script-fu -> Refresh scripts from the main menu.
Open the original multi-burst image, you can apply filters to enhance the image if you wish, but if the picture was taken in portrait mode don't rotate the image (the script can do that) as it would change the order of the frames and the resulting animation would seem scrambled.
Time to use the script: right-click on the image and from the contextual menu, choose Filters -> Animation -> Multi-burst to animation.
The following dialog will pop up:
The default options will work for a multi-burst photo with landscape orientation, change them if needed and click OK. The animation will be saved in the same folder and with the same filename as the original image, ending with "-anim.gif". Here is the resulting animation for the image above:
Gmail has added new emoticons or smileys, and you have now 1342 (as of 2009-07-25) faces, animals, objects and symbols to express your feelings by email, take a look at the complete list at the end of the post.
In order to use these, so called emojis, you have to activate the Extra Emojis feature, as follows:
If you have used before google labs features in gmail, you will find a green icon on the upper part of the screen, click it to open labs settings; if you don't see the icon, then go to step 2.
Go to gmail settings:
Then to google labs settings:
Scroll down to Extra Emoji and enable it:
Don't forget to save the change you've just made:
Then, when composing new messages, you will find the new emoticon categories next to the three original ones:
Unlike iPhone, the iPod touch has no integrated microphone, second generation ipod touch, however, supports external microphone connected to the earphone plug, which allows the use of VoIP applications such as skype or fring with a wi-fi link. All you need is the right microphone; of course you can buy one for example from apple or griffin, but is funnier and cheaper to do it at home.
(By the way, if you'd like to download music for your ipod or iphone from youtube, check this post)
We will see how to buid a handsfree set that can be connected to an iPod touch 2g and used with skype or other application that uses the microphone; this will also work with an iPhone.
What will we need:
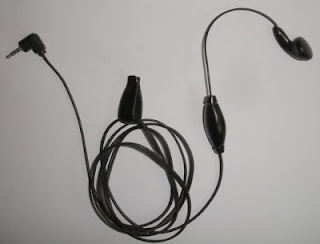
Handsfree set for mobile phone or other device with microphone and earphone. In this example we will use a popular one from nokia:
A 4-conductor 3.5mm plug, also known as TRRS plug:
Soldering iron
Multimeter
First let's identify microphone and earphone cables, for this we open the microphone case. This is a front view:
Seen from the back, at the right there are the lines coming from the earphone (green) and we can trace them back, the other two are microphone's (pink). Now we identify the color of the cables that correspond each one, polarity doesn't matter, only which pair of colors matching each:
Colors will vary depending on the handsfree model, in this case they are:
Earphone: green and red-green
Microphone: yellow and red
ANow let's cut the cable of the handsfree and near the orignal connector and split the cables:
And solder them to the TRRS connector, like this:
You can note that one of the contacts is not used, since it is for the other channel in a stereo signal and the handsfree is monophonic. As VoIP apps like skype are not stereo, this is not a problem.
Some cables have a thin layer of insulating varnish that will complicate the soldering process, in this case gently scratch the insulation with a sharp edge, to remove the insulating varnish before soldering.
It is also wise to verify with the multimeter that there are not short-circuits in the solders, you should be able to measure the resistance of the microphone and earphone (some hundred ohms typically) and between them there should be an open circuit.


